I know my blog is a bit bare, but I wanted to keep this blog a particular style. I wanted to make sure I am able to include pictures of most everything I cook. I could post up a bunch of recipes I have created and alter over the last few years, but I think the pictures give a certain appeal. This weekend I am going to try a couple of new things. I am creating a special meal so that I can work on my plating and presentation. I wish I had bought some white places instead of the red ones I have now. I finally understand why white is a classic color to go with, because it makes plating easy. The red of my plates could and probably will throw off the colors of the meal. Oh well, once I can I will buy white plates especially for this blog.
I will start with a simple romaine salad. I am still unsure exactly how I am going to go about this since I am only referring the style of the salad from a picture. I will find a way though. The salad has a romaine and spinach center with cucumbers wrapped around the outside of the salad to make it appear like a bouquet would. There are thin carrots sticks coming from the top of the salad. I will post both pictures in my blog once I write it this weekend.
The entrée is going to be stripped raviolis stuffed with spinach. I got the stripped ravioli idea from another blog. I will give credit and show the picture of her finished product. Mine will not be exact to hers. Mine will only be stipped with red/orang’ish color instead of orange and green. I thought the gree stripe in addition would be too much figuring the inside of my ravioli will be stuffed with a nice dark spinach. I will top these with a light alfredo sauce.
Also served will be Chicken Cordon Bleu, which I haven’t ever made before. I have made similar stuffed chicken, but not exactly what this is. Mine will still be altered since I am trying to work with food I already have in my kitchen. I will be stuffing the chicken with a smokey turkey. Instead of swiss on top I will be using provolone cheese. I suppose this isn’t called Chicken Cordon Bleu anymore, is it? Haha. That’s okay!
So that is my project for the weekend. I will update my blog again once I have taken all of the pictures.
Feedback is welcomed! Questions, Comments, Suggestions? Please post!
Thank You,
Chef Diva

- Jennifer aka Chef Diva
- I have a passion, this passion is experimenting in the kitchen. A perfect night for me would to come home grab my MP3 player drive over to the market and pop in my ear buds and listen to some Jack Johnson while I shop for some ingredients. I would come home and begin the meal preparations and put on some blues music while a few friends come over. I would entertain them while cooking. We would enjoy some wine and conversation as I decorate their plates and let the feast begin. Yes, this is the perfect night.
Monday, July 26, 2010
Monday, July 19, 2010
Chicken & Spinach Stuffed Raviolis
My kryptonite is totally Pasta, without a doubt in the world. I have always wanted to make my own pasta, so finally about a year ago I did. I love ravioli's, but I just don't see the point on spending $10 at a grocery store to buy a small amount when I can spend less money and make a much larger amount. So I went online and a found a very basic ravioli recipe and began my adventure and boy was it messy!!
Supplies
Ingredients for Ravi's
Ingredients for Stuffing the Ravi's
Step 1
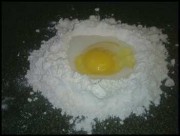
On your clean counter top take 1 cup of flour and make a hole in the middle of it, make sure you don't dig so far that the counter is visible again. You then crack open 1 egg and put it into the center of the flour. Add in 1 tbsp of water and your salt & sesons if you are using them this time around. Now for the hard part. You will break the yolk of the egg and slowly add in flour from the edges working your mixture. Be careful, you don't want to break the circle of flour, because you will end up with a really messy counter top. You will work all of the ingredients until you begin to form a dough, this should only take 5-7minutes.
Note: If you think that this is going to be too hard, just put everything in a bowl to start with instead on the open counter. You can use a mixing spoon for this portion if you don't like getting your hands messy, but I feel its always done best with your own hands.
Step 2
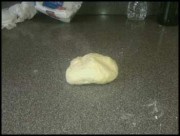
Once all of your ingredients are mixed, you will then kneed your dough for about 10minutes. Longer if you would like, but I find 7-10 is the best, because it doesn't make the dough too hard and easier to shape.
Note: I will usually seperate the dough in half so tthat I don't have so much to work with, once you start rolling it out it can become a hassle if its too big. If you want to seperate it, make sure you wrap the other half up in plastic wrap so that it doesn't dry out.
Step 3
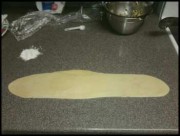
You will start to roll out the dough, I always feelin it's a bit hard to start it, but once you get going it becomes easier. I always keep a little eextra flour around incase the dough sticks to the counter or rolling pin. If your dough becomes to long for the counter, which mine always does. I just drap half of the dough over the edge while I roll out the half on the counter. I switch back and forth every so often so that it stays even. You wwant to make the dough about the thickness of a nickel or dime. Remember, when you boil the dough it will double in thickness.

Step 4
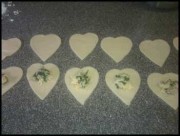
You will then take your cookie cutter or glass and cut out the shapes of your ravi's. I will often use wax paper so that the shapes do not stick to the counter, if they do they end up usually getting their shape altered/messed up. Remember to work with an even number because you are creating the tops and bottoms of your raviolis.
Note: Depending on the size of your cookie cutter or glass will determine the amount of ravioli's you will end up having. I can usually make about 16-18 with the one I have so I often double or tripple the recipe if I want to make some and freeze them for later use.
Step 5
I'm sorry I don't have a picture of me creating the stuffing for the ravioli's, but here is a quick how to. There are two options;
Option 1
Cook up your chicken, onion, and season lightly as desired. Chop it up into small pieces and set aside in a bowl in the fridge. Boil your spinach as directed on the packaging. Drain and dry with papertowels. Add into your bowl and mix in the cheese.
Option 2
Cook up your chicken with desired seasons and cut into bite sized pieces. Then, place it into bowl and let chill in the fridge. Boil up your spinach and onion, you still want to follow the directions on the package of the spinach. Drain and pat dry with a papertowel. You will then cut up your cheese into bite size pieces. Make sure each ingredient is in its own bowl.
Note:It doesn't matter which method you use, you want all of your ingredients to be chilled before you stuff your ravioli's.
Step 6
Depending on the option you used above you will either spoon your mixture onto the the ravioli's or you will layer your mixture. I like doing it either way. You just have to make sure you don't over stuff your ravioli's. You will create an egg wash by using only the whites of an egg and adding just a little of water. You will mix it up and brush or use your finger to moisten the outside edges of the ravioli's before placing the top on.
Step 7
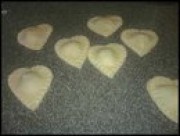
Now, you will place the tops of the raviloi's on. I usually do one at a time with the egg wash so that it doesn't dry before I can get them all put together. Once you have the top on it you will take a fork and press the edges together. I will do one side, flip it over and do that other side just to make sure its pressed firmly together. I then take them and lay them on a cookie sheet and place them into the freezer. I will covered them with plastic wrap. You do not want to freeze them completely unless you tend to use them at a later date. I just like putting them in the freezer so that their shape will maintain and it gives the egg wash time to dry so that the edges are completely stuck together. I will leave them in there for only 5-7minutes.
Once you're ready to eat them just boil them for 10-12minutes in water. Top with your favorite sauce.
Bon Appétit
♥
Feedback is welcomed! Questions, Comments, Suggestions? Please post!
Thank You,
Chef Diva
Supplies
Ingredients for Ravi's
Ingredients for Stuffing the Ravi's
Step 1
On your clean counter top take 1 cup of flour and make a hole in the middle of it, make sure you don't dig so far that the counter is visible again. You then crack open 1 egg and put it into the center of the flour. Add in 1 tbsp of water and your salt & sesons if you are using them this time around. Now for the hard part. You will break the yolk of the egg and slowly add in flour from the edges working your mixture. Be careful, you don't want to break the circle of flour, because you will end up with a really messy counter top. You will work all of the ingredients until you begin to form a dough, this should only take 5-7minutes.
Note: If you think that this is going to be too hard, just put everything in a bowl to start with instead on the open counter. You can use a mixing spoon for this portion if you don't like getting your hands messy, but I feel its always done best with your own hands.
Step 2
Once all of your ingredients are mixed, you will then kneed your dough for about 10minutes. Longer if you would like, but I find 7-10 is the best, because it doesn't make the dough too hard and easier to shape.
Note: I will usually seperate the dough in half so tthat I don't have so much to work with, once you start rolling it out it can become a hassle if its too big. If you want to seperate it, make sure you wrap the other half up in plastic wrap so that it doesn't dry out.
Step 3
You will start to roll out the dough, I always feelin it's a bit hard to start it, but once you get going it becomes easier. I always keep a little eextra flour around incase the dough sticks to the counter or rolling pin. If your dough becomes to long for the counter, which mine always does. I just drap half of the dough over the edge while I roll out the half on the counter. I switch back and forth every so often so that it stays even. You wwant to make the dough about the thickness of a nickel or dime. Remember, when you boil the dough it will double in thickness.
Step 4
You will then take your cookie cutter or glass and cut out the shapes of your ravi's. I will often use wax paper so that the shapes do not stick to the counter, if they do they end up usually getting their shape altered/messed up. Remember to work with an even number because you are creating the tops and bottoms of your raviolis.
Note: Depending on the size of your cookie cutter or glass will determine the amount of ravioli's you will end up having. I can usually make about 16-18 with the one I have so I often double or tripple the recipe if I want to make some and freeze them for later use.
Step 5
I'm sorry I don't have a picture of me creating the stuffing for the ravioli's, but here is a quick how to. There are two options;
Option 1
Cook up your chicken, onion, and season lightly as desired. Chop it up into small pieces and set aside in a bowl in the fridge. Boil your spinach as directed on the packaging. Drain and dry with papertowels. Add into your bowl and mix in the cheese.
Option 2
Cook up your chicken with desired seasons and cut into bite sized pieces. Then, place it into bowl and let chill in the fridge. Boil up your spinach and onion, you still want to follow the directions on the package of the spinach. Drain and pat dry with a papertowel. You will then cut up your cheese into bite size pieces. Make sure each ingredient is in its own bowl.
Note:It doesn't matter which method you use, you want all of your ingredients to be chilled before you stuff your ravioli's.
Step 6
Depending on the option you used above you will either spoon your mixture onto the the ravioli's or you will layer your mixture. I like doing it either way. You just have to make sure you don't over stuff your ravioli's. You will create an egg wash by using only the whites of an egg and adding just a little of water. You will mix it up and brush or use your finger to moisten the outside edges of the ravioli's before placing the top on.
Step 7
Now, you will place the tops of the raviloi's on. I usually do one at a time with the egg wash so that it doesn't dry before I can get them all put together. Once you have the top on it you will take a fork and press the edges together. I will do one side, flip it over and do that other side just to make sure its pressed firmly together. I then take them and lay them on a cookie sheet and place them into the freezer. I will covered them with plastic wrap. You do not want to freeze them completely unless you tend to use them at a later date. I just like putting them in the freezer so that their shape will maintain and it gives the egg wash time to dry so that the edges are completely stuck together. I will leave them in there for only 5-7minutes.
Once you're ready to eat them just boil them for 10-12minutes in water. Top with your favorite sauce.
♥
Feedback is welcomed! Questions, Comments, Suggestions? Please post!
Thank You,
Chef Diva
Thursday, July 15, 2010
My Adventures in the Kitchen
I finally decided to start an official blog that will take you through my adventures in the kitchen. You can say that I have always been very fond of cooking, it’s a way for me to relax. What I enjoy the most is the feedback from my friends and family in regards to the dish I just made them. I love to constantly improve my skills, by no means do I claim to be an expert, but one day I hope to be. I have this friend that I used to cook for often, until I moved to another state. I would cook for him usually once a week or every couple of weeks. You could say that I really looked forward to these nights, because I was able to experiment with something that I had been creating in my mind. Before I moved he gave me a nickname that I kind of like, Chef Diva.
I hope you will join me on this journey watching me grow and learn new skills and use my abilities in the kitchen to create delicious foods.
Feedback is welcomed! Questions, Comments, Suggestions? Please post!
Thank You,
Chef Diva
I hope you will join me on this journey watching me grow and learn new skills and use my abilities in the kitchen to create delicious foods.
Feedback is welcomed! Questions, Comments, Suggestions? Please post!
Thank You,
Chef Diva
Subscribe to:
Posts (Atom)